
Last Updated on September 24, 2025
Making homemade fettuccine pasta is a fun project to try, and the result is tasty pasta. I’ll show you how to do it by hand or with a pasta-making machine. The pasta is chewy and delicious. It will taste perfect with your favorite sauce.
This recipe post contains affiliate links.

Homemaking Pasta
If you’ve ever had freshly made pasta, you’ll know how good it is…and it is so much different from dried, boxed pasta. It is silky smooth in your mouth and has a tenderness that you don’t find in boxed pasta.

What Kind Of Flour To Use
Wheat flour comes in different varieties and is classified as either “soft” or “weak” if the gluten content is low. These are the flours used to make cakes and pastries. “Hard” or “strong” flour is high in gluten and is more elastic when worked into the dough. Strong varieties of flour are used to make pasta.
All-purpose flour has 10% to 12% gluten and is usually ground from a combination of hard and soft wheat. As its name implies, it is a good all-around flour for breads, pie crusts, biscuits….and pasta.
Fine-ground semolina flour is known as pasta flour. It’s made from hard durum wheat and has a coarse texture to it. You can use 100% semolina or use it in a blend of flours for better workability. Emeril Lagasse has a 100% semolina pasta recipe on his site and has this caveat, “* The more semolina a dough has, the more challenging it is to knead; work it as best as you can or knead it in a standing electric mixer fitted with a dough hook.”
There is also a flour known as “OO”. OO refers to the fine grind that it has. I’ve seen this referred to as “Italian OO flour.” It’s not much different than all-purpose flour and might be a little “softer” than all-purpose. MaryJo was able to find some at an Italian meat and deli store and this is what I used for one batch of pasta dough.
You could also combine different types of flour, especially mixing semolina with OO or all-purpose. I made 2 batches using OO for the food processor and machine made pasta. I used all-purpose for the hand made pasta.

Other Pasta Recipes To Try
While we’re making pasta here, you might want to check out these recipes featuring pasta. If you have a pasta machine, you might want to make spaghetti noodles for some of these.
Living in Florida, we have seafood dishes quite often….like seared scallops with garlicky pasta or tomato spinach pasta with spicy shrimp or perfect creamy shrimp scampi.
Or you could try a couple of meatless pasta dishes…penne pasta with vodka sauce or linguini pasta with white beans which is really good.
Mixing The Pasta Dough
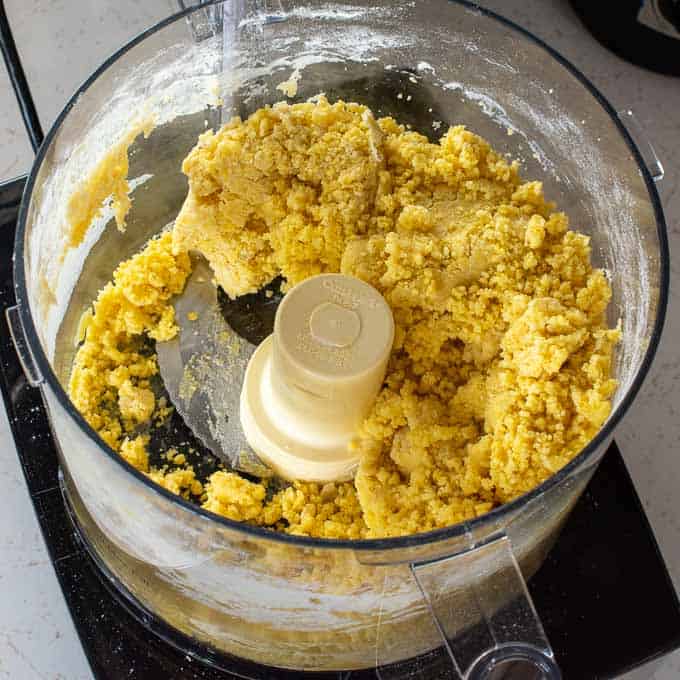
If you have a food processor, mixing the dough is really easy. Place the ingredients into the bowl and pulse together for 10 to 15 seconds. Scrape the sides down halfway through if necessary.
Place the dough on a board and knead for 2 or 3 minutes for the dough to come together. If the dough is sticky, work a bit more flour into it. It should not stick to your hands or the board while kneading. Form it into a ball and wrap it in plastic wrap. Set aside for at least 30 minutes or refrigerate up to overnight.
You can also mix the dough with a stand mixer. Use the flat paddle and mix until the ingredients are totally combined. Then switch to a dough hook and knead for several minutes. Add more flour if the dough seems sticky. Remove from the bowl and hand knead it to form a ball. Wrap tightly in plastic wrap and allow to rest.

Mixing By Hand
To mix the dough by hand, refer to the top photo. I mixed the dough on a board and kept a bench scraper handy in case the eggs got out of hand. This same basic technique could be used in a large bowl following the same steps.
Measure out the flour and make a pile in the middle of your board. Form a well with your fingers or fist big enough for the eggs. Crack your eggs into a bowl, in case there are some shell pieces to fish out. You can lightly beat the eggs now if you wish. Pour the eggs into the well and add the salt and olive oil.
Would you like to save this recipe?
Use a fork to work around the edges of the flour to begin mixing the wet and dry together. The scraper is a nice tool to have because once the dough is nearly together it can be used to fold the dough to get it to blend. When you start to work the dough by hand, it could still be pretty wet. Keep some flour ready so you can coat your fingers and the board. My dough seemed pretty wet and I had to work in 4 or 5 more tablespoons of flour.
Knead the dough for 8 to 10 minutes, (it is more work than when using a food processor). Add flour as needed so it does not stick to the board. Form it into a ball and wrap it with plastic wrap. Let it rest for 30 minutes or more.

Rolling And Cutting The Pasta
The recipe makes around 1 1/4 pounds of dough and it needs to be broken down into manageable amounts.
Rolling And Cutting With A Machine
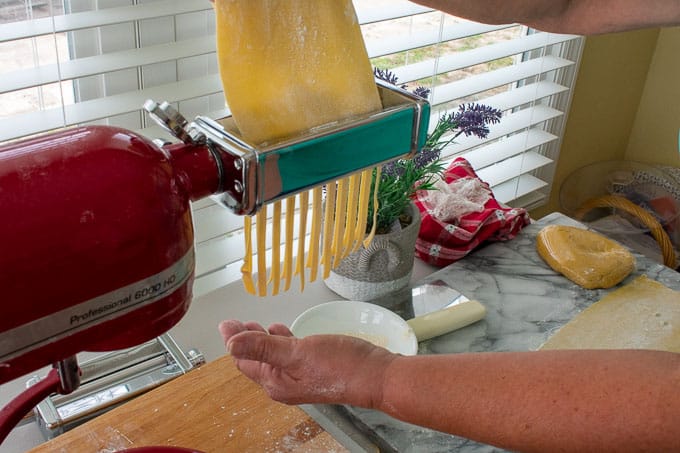
If you are using a machine roller, divide the dough into 6 pieces. Set the roller to the widest setting, the Kitchen Aid setting is #1. Turn the machine on to speed #2. Flatten a piece of the dough with your hands and insert into the roller. Fold the dough in half and reinsert into the roller. Add a little flour if the dough seems sticky. You should fold and reinsert the dough several times to knead the dough so it is smooth and pliable.
Then proceed to the next finer settings rolling until the dough is as thin as you want. In this case setting #5 using the Kitchen Aid for fettuccine. You will probable find it easier to cut the dough in two strips when it gets thinner since you’d be working with a 4 foot strip of dough.

Put the cutting head on the machine and feed the flattened sheets of dough through the cutter. Dry the finished pasta in a single layer on a drying rack or on a towel. It’s important to separate the strands so they don’t stick together. Let them dry for 30 to 45 minutes. Store the dried pasta in an air-tight container in the refrigerator for 2 to 3 days or freezer up to 3 months.

If you are using a hand crank machine, the process is the same except you supply the power. Here’s a link to a very good hand cranked machine…the Marcato Atlas 150, (#ad).
The Kitchen Aid pasta attachments are available in this link, (#ad).
Rolling And Cutting By Hand
Using a rolling pin to make the pasta is fairly easy, just a bit more time and effort.
I divided the dough into 4 pieces and worked on a large cutting board. Roll the dough out into a rectangular shape. Add flour if the dough seems to stick. It will have a tendency to want to recoil so be patient and keep working it to get as thin as you can. The picture below is half of the recipe rolled out.

Cutting the pasta into fettuccine is easy. Cut the sheet of dough in half, then roll into a cylinder starting at the shorter edge. Use a knife or pizza cutter to cut the pasta strips approximately 1/4″ thick. Once cut, unroll the pasta and lay out to dry. Repeat for the remainder of the dough.

Cooking Fresh Pasta
Bring a large pot of salted water to a rolling boil over high heat. Add the pasta and stir so it does not stick together. Depending on the thickness of the pasta, it should take 1 1/2 minutes to 3 minutes for the pasta to be al dente. Test the pasta by grabbing a piece with a fork. When done it will seem silky or bouncy and not taste like flour. The pasta will also start to float to the top when it is ready.


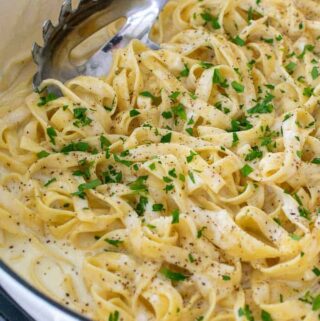
Drain and serve the pasta with your desired sauce. Marinara or red sauce, Alfredo, and Aglio e Olio, (garlic toasted in olive oil), come to mind. However you serve it, I’m sure it will be a hit.
Homemade Fettuccine Pasta
Ingredients
- 4 large eggs, room temperature
- 2 1/2 cups flour, (all-purpose, semolina, OO, or a blend of your choice)
- 2 tsp extra virgin olive oil
- 1 tsp fine salt
Instructions
Mixing dough in a Food Processor
- Place all the ingredients into the processor bowl using the standard cutting blade and pulse 6 to 8 times to totally combine the ingredients. Remove the dough from the bowl and knead for 2 or 3 minutes adding extra flour if the dough sticks to your hands or the surface. Work into a ball then tightly cover with plastic wrap. Let rest for at least 30 minutes or you can also store it in the refrigerator up to 24 hours.
- If mixing in a stand mixer, place all ingredients in the bowl and mix with the paddle attachment until combined. Switch to a dough hook and knead for 4 or 5 minutes adding more flour if the dough sticks to the dough hook. Remove from the bowl and knead by hand and form into a ball and tightly cover with plastic wrap, Let rest as above.
Machine fettuccine cutting
- Separate the dough ball into 4 to 6 pieces. Affix the roller to your stand mixer or the manual roller to a tabletop. Starting with the largest thickness setting, flatten one of the pieces of dough with your hands and put it through the roller. Fold the dough strip in two and roll again. Add more flour if necessary to keep it from sticking. Do this several times to make the dough smooth and pliable.
- Adjust your machine to the next smaller thickness setting and roll the dough strip through. Continue until the dough is through the #5 or #6 setting. You will probably find that the dough is much too long and you should cut it down to a manageable length. Dust flour on the strips to keep them from sticking, (they should be pretty dry).
- Place the fettuccine cutting head on the stand mixer, or change your handle on the table mount machine. Feed the sheets of pasta through, and then hang the pasta on rods or a pasta rack. I can also be placed on a towel to dry. Continue with the remainder of the dough. Let dry 30 to 45 minutes or use right away. Store in an air-tight container in the refrigerator or in your freezer.
Mixing dough by hand
- Place the flour in a pile on a large working space. Use your fingers to make a well large enough to hold the eggs, (like a volcano). Crack the eggs into a small bowl then pour this into the well and add the salt and olive oil. Use a fork to lightly beat the eggs and then start to slowly work the flour into the egg mixture. Continue outward until most of the flour has been incorporated then use your hands or a bench scraper to fold the remainder into the eggs. This will probably stick to your fingers, just add flour a little at a time until the dough is no longer sticky and you can knead it. Knead for 8 to 10 minutes to make it pliable. Make a ball of dough and tightly wrap with plastic wrap. Let rest for 30 minutes or more.
Rolling and cutting the dough by hand
- Separate the dough ball into 4 pieces. Lightly flour a large working surface and use a rolling pin to roll the dough into a rectangular shape. Dust with more flour as needed to keep the dough from sticking to the surface and the rolling pin. Continue to roll until the dough is about 22" by 10". That should make the dough pretty thin. Continue to roll the other 3 pieces of dough.
- Cut the dough strips into two pieces at the narrow side. Roll the dough into loose cylinders starting with the shorter side. Use a knife to cut pasta strips approximately 1/4" wide. Uncoil the strips and lay them out to dry or place on a rack. Store in an air-tight container in the refrigerator or freezer.
Notes
- Use flour that is high in gluten content or a combination of flour types like, all-purpose, semolina, OO, or bread flour.
- Fresh, homemade pasta is generally used the same day it is made or perhaps the next day. It can be stored in the refrigerator for 2 to 3 days or frozen for 2 to 3 months.
Dan Nelson
Delicious, will definitely make it again, thanks Joe!
Joe Boyle
Thanks Dan!
Abby
Alot of the recipes I come across only want the yolk of the egg, is that the same here, or should I use the whole egg? Either way thank you, I love this recipe!
Joe
Hey Abby, I use the whole egg and I know a lot of recipes call for just the yolks. The thing is, the dough is pretty much the same once everything is combined. I think the pasta turns out to be pretty good this way. Thanks for asking.
Joe
Kristin Nelson
Now I can make pasta!
Sandy Axelrod
Joe, your fettuccine looks so wonderful it makes me want to unpack my pasta roller and make some. But we are up to our eyeballs in packing for our big move. We have sold our home and are finally going to live our dream of traveling full time in our RV. May 26 we will officially be “Full Timers”!!!
Joe
Hopefully things will start opening up so you can enjoy the sights. Good luck and Happy Trails Sandy.