Baked cheese crisps are so easy to make and are perfect for a low-carb diet. This is a delicious keto snack made with any variety of cheese of your choice.
This recipe post may contain affiliate links. Please see our Privacy Policy for details.
Cheese crisps are an overlooked savory, low-calorie snack or appetizer. Everyone has some kind of cheese sitting in their refrigerator. Grate it up and in 20 minutes you could have yourself some golden brown Parmesan cheese or cheddar crisps.
Equipment Needed to Make Baked Cheese Crisps
First of all:
Oven – I would suspect that every kitchen has one.
Cheese grater – to grate block cheeses. You may also use bagged, shredded cheeses to make the crisps.
Large baking sheet or cookie sheet – a half-sheet (11 by 17 inches) is perfect.
Parchment paper – this is a must because it allows the hot crisps to be removed without much sticking.
Cooking oil spray – spray a little bit on the parchment paper so that the crisps release easily.
Thin spatula – a thin metal turner works best to pick up the cheese crisps.
Types Of Cheeses To Use And Additional Toppings
Hard cheese is what I am used to making the crisps with, but even softer cheese like mozzarella can be used.
Examples of hard cheese are:
Asiago
Gruyere
Parmesan
Romano
Cheddar
Manchego
Gorgonzola
Emmental
Queso Quesadilla
These cheeses can be shredded and baked so that they melt and spread into a crispy, deliciously crunchy, low-calorie snack.
What will take these low-carb cheese chips to the next level are added toppings and spices. Your imagination is the limit. Here’s a list of examples.
Suggested Toppings And Spices To Use For Different Cheeses
The flavor of the cheese you are using will dictate the type of extras you put on them. I made cheese crisps out of 9 different kinds of cheese. Sharp cheddar, Parmigiano Reggiano, Pecorino Romano, mozzarella, Gouda, manchego, gruyere, asiago, and bagged, shredded 4 cheese Mexican blend.
Mexican 3 cheese blend that was pre-shredded – not oily, 10 minutes, jalapeno, chili powder, chipotle, bacon, onion, and cayenne pepper.
Of all the cheese tested, the pre-shredded Mexican was most notable in that its properties were quite different from the block cheeses. It barely left an oil mark on the parchment paper and it didn’t appear to melt as I baked it with the parmesan and romano and removed the sheet pan from the oven after 7 minutes.
The pre-shredded cheese is very handy to use, but it has additives that change the properties a lot. The cheese didn’t really melt. It slumped a little bit.
Would you like to save this recipe?
We'll email this post to you, so you can come back to it later!
The Mexican blend cheese I used has potato starch, powdered cellulose, and a mold inhibitor. It, therefore, contains 1 gram of carbohydrates. It is so different than when using block cheese. This is why I never buy pre-shredded cheese. I’ll grate it myself.
10 minute baking time for top to bottom: Mexican blend, mozzarella, and Parmesan.
The toppings, herbs, and spices I used were: bacon bits, jalapeno slices, pepperoni, chopped onion, Italian seasoning, chili powder, smoked paprika, and chipotle seasoning.
The best and most versatile toppings are in my opinion bacon bits. They could be used on any of the variety of cheeses. Also, coming in a close second are jalapeno slices and finely chopped onion. They were both very tasty with any of the cheeses.
The most notable herb blend was the Italian seasoning that I tried on Parmesan and Romano. It had a complimentary flavor with the cheese.
The other powdered seasonings were subtle in flavor compared to the things mentioned above. The smoked paprika, which is a pretty strong flavoring, tasted great on the gouda. It had an almost bacon-like flavor which was nice.
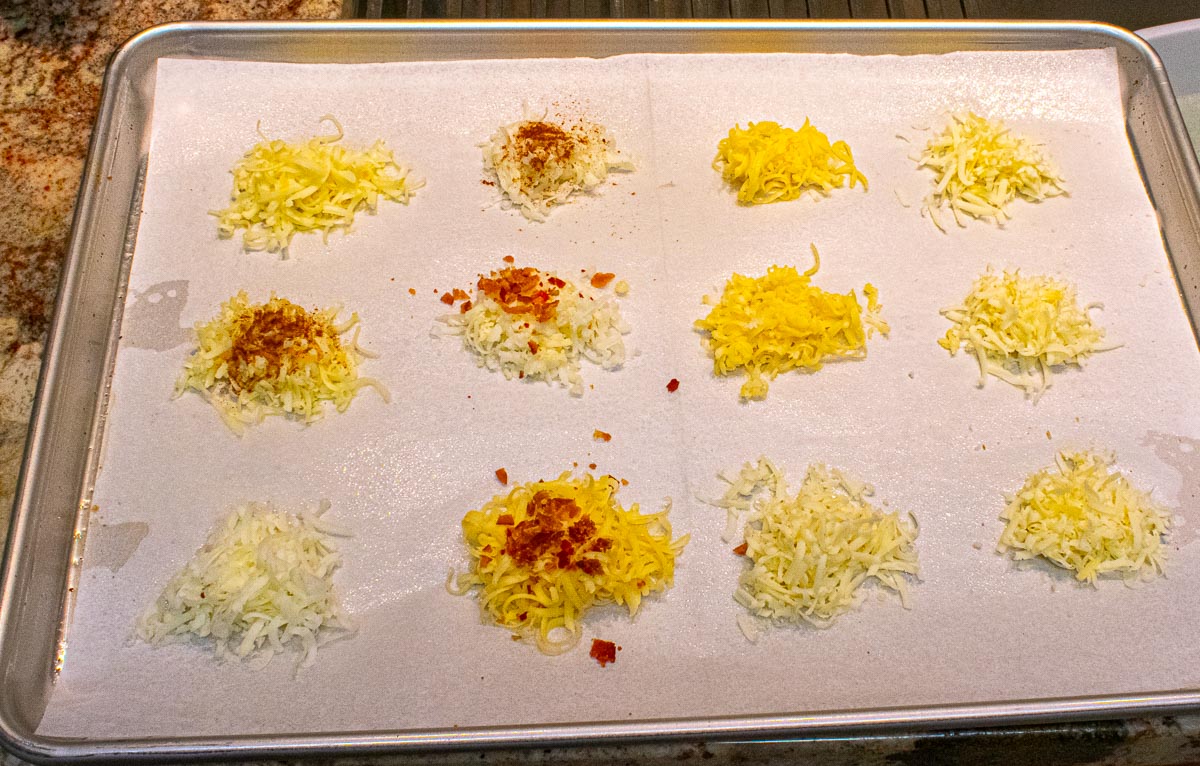
Grate the cheese you are going to use. Each crisp will be made with 1 to 2 tablespoons worth of grated cheese. The ones pictured that I baked are closer to 2 tablespoons.
Use your fingers to place mounds of cheese on the parchment paper leaving about 2 inches of spacing between mounds. 3 stacks across and 4 stacks down works perfectly giving you 12 crisps.
Place the toppings and spices you are using onto the cheese. Use as much as you dare and remember that the cheese is going to spread.
Bake for 7 to 12 minutes depending on how crisp you would like the cheese to be. 10 to 12 minutes for crunchy and 7 to 8 for chewier cheese. It’s all good.
Remove the sheet from the oven and let it cool for 1 or 2 minutes. Then take your metal spatula to lift up the parchment slightly and carefully pull the parchment out of the baking sheet onto a flat surface. Allow the crisps to cool for 2 or 3 more minutes.
Arrange 2 thicknesses of paper towels large enough to hold the 12 crisps. Use your thin spatula to lift up the cheese and place it onto the paper towel to soak up excess oil.
These are perfect and easy savory snacks for any time of the year. Great for New Year’s or a Super Bowl party.
Storing And Freezing The Cheese Crisps
Store leftovers in an airtight container in your refrigerator for up to 7 days. I find that it is best to arrange them in layers in a container separated with paper towels.
Freeze the crisps by vacuum sealing them with a Food Saver or in a heavy ziplock bag for up to 6 months.
The cheese will have lost its crispness but the flavors will still be present.
Serving The Cheese Crisps
You will probably want to have a dip of some kind for the chips. Any basic sour cream dip recipe like this one from Holly at Spend With Pennies would be great.
Another dip for the Italian-style cheeses would be a basic Marinara sauce. Parmesan, Romano, and mozzarella need this. A store-bought sauce would be fine or make your own using this simple recipe from Gina at Skinny Taste.
The recipe card for this post will be representative of a basic baked cheese crisp recipe since the ingredients used will vary. I’ll use Parmesan as the base cheese since it is one of the higher-calorie cheeses at about 122 kcal. per ounce. And I’ll include bacon of course.
Baked Cheese Crisps Recipe (Keto Diet)
Baked cheese crisps are so easy to make and are perfect for a low-carb diet. This is a delicious keto snack made with any variety of cheese of your choice.
additional toppings whose nutritional content and calories are minimal, *see notes
Prevent your screen from going dark
Instructions
Preheat your oven to 375° F.
Fry bacon to crispy and chop into bits. Chop the onion very fine. Assemble other toppings and spices as desired. If using jalapeno peppers, 1 tbsp of chopped jalapeno peppers is 1.6 calories. Grate the Parmesan cheese using the small holes for shredding. *see notes.
Line an 11 by 17 inch sheet pan with parchment paper and very lightly spray with cooking oil like Pam.
Place 2 tablespoon mounds of shredded cheese, using your fingers, onto the parchment leaving about 2 inches between mounds. You should have a total of 12 mounds of cheese, 3 across in a row and a total of 4 rows.
Next, add your desired toppings and remember that the cheese will spread when baked so allow for plenty.
Place the baking sheet into the oven and bake for 7 to 12 minutes. 7 minutes for a chewier texture and 12 minutes for a crunchy texture. Watch that they don't become burnt due to variations in temperature in different ovens.
Remove the sheet from the oven and allow to cool for 2 minutes. Then use your metal spatula to get under the parchment paper on the short side and pull the parchment off the baking sheet onto a smooth surface.
Let the cheese cool for 3 more minutes and then use the spatula to lift the chips onto a double layer of paper towels.
Serve the cheese crisps at room temperature with a tasty dip.
Notes
Parmesan is a hard cheese and therefore is easy to grate using the small holes. For softer cheeses, you can place them in your freezer for at least 30 minutes for them to firm up and be easier to grate.
Store leftovers refrigerated in an airtight container. Place the crisps in layers separated with paper towels. Keep up to 7 days.
You can freeze the leftovers for up to 6 months either vacuum sealed or in a heavy ziplock type bag.
The nutrition information is for 4 crisps with bacon and onion. The onion adds about 3 grams of carbs so omit them for a zero carb snack. Dipping sauces were not included.
I'm not on a keto diet so therefore, I get to drink a Stella while enjoying the chips.


MaryJo
Yum! Love these crisps. Invite your friends, pour the adult beverages, and pass these around. You are now the host with the most!!