
Last Updated on March 5, 2025
A 5 gallon self-watering planter is perfect for people with limited space or who have bad soil to begin with. You can grow tomatoes right on your patio! Oh ya’, Let’s Do This.

Last fall I went to a gardening seminar and they showed me how to make a self-watering planter. Since I’m in Florida and have terrible soil, I was all in on the idea. It just took me a few months to get it done.
After a little more research, I found a self-wicking method for self-watering planters that’s easy, requires little in the way of tools and so far has given me excellent results.
So, if you have limited space for growing or have poor soil, you should definitely give this a try. Bucket planting tomatoes especially is pretty easy.

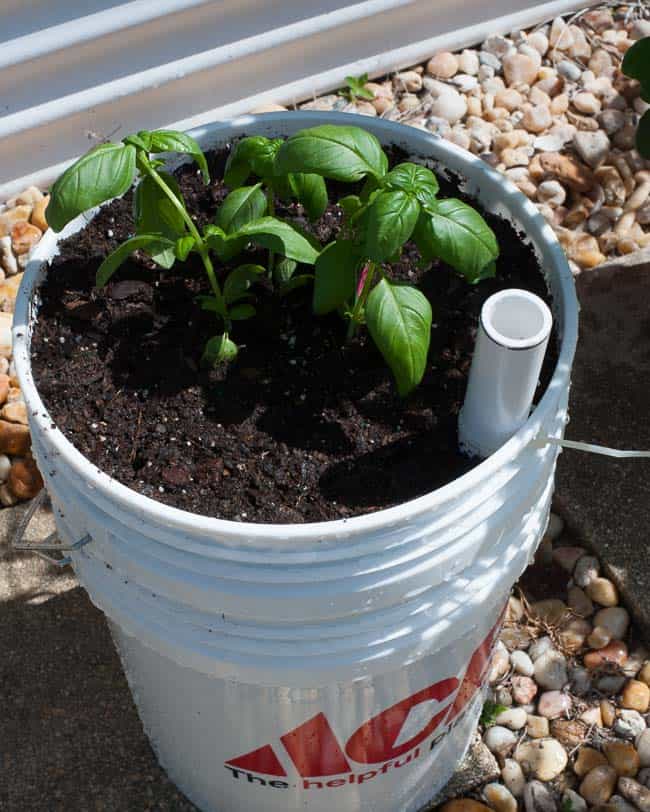
This is the inside bucket of a two-bucket self-watering planter.
Tools You Will Need
The tools you will need for this are: drill with a 1/4″ bit, a utility knife, hacksaw, scissors, and a sharp pocket knife or paring knife.
To start out you’ll need two 5 gallon buckets, 2 cheap kitchen sponges, a length of 1″ PVC pipe, (20 inches), and an old 100% cotton bath towel.
Steps for Making a Self-Watering Planter
1. Cut the bath towel into 3″ wide strips. You’ll need the length to be 3 to 4 feet long and you’ll need three of these.
All I had was an old hand towel so I made 6 strips and sewed them together for more length and then cut off 6 or 8 inches when I tucked the strips into the soil. You’ll see how this works later.
2. The inside bucket is where you do all the cutting and drilling.
Drill eight 1/4″ drain holes in the bottom first. Then use a utility knife to make a 1 1/2″ to 2″ hole in the center of the bottom. It doesn’t have to be pretty. You just need a hole for the 3 strips of cloth to go through.
3. Use a hacksaw to cut a piece of 1″ PVC to 20″ and trim one end on an angle to let water freely pass through when inserted into the water reservoir.
4. The PVC pipe then needs a hole in the inside bucket to pass through, (photos #4 & #5), so use a marking pen to trace the circumference, and carefully cut the hole for the pipe near the edge of the bucket.
I just used my utility blade to do this. Cut around the interior marked line to get a pretty snug fit. This will prevent soil from falling down into the water reservoir.
5. Just check to see that the pipe fits.
6. In the outside bucket there’s only one thing you need to do. A drain hole has to be drilled so the planter doesn’t overfill. A 1/4″ diameter hole 2 3/4″ to 3″ from the bottom will do it.

Drill a 1/4″ drain hole in the outer bucket. Then secure the cotton wicks with sponges on the inner bucket. This is how the water in the outer bucket retains water and it wicks up to the soil in the inner bucket.
7. The 2 sponges are what keep the fabric secure, and prevent soil from getting into the bottom bucket.
Make a 1″ to 1 1/2″ slit through the middle of the sponges for the cloth strips to slip through. I found that a good sharp knife is the best thing to use to make the slits.
8. Take the 3 cloth strips and run them through one sponge, leaving 6 or 7 inches hanging out one side. This is the length of cloth that hangs in the water reservoir to wick the water up to the soil.
Feed the long end of the 3 strips of towel up through the bottom of the inner bucket.

The wick goes down into the outer bucket. Ready for the water to get sucked up into the soil. So, both inside and outside of this bucket have a sponge to hold the wick material.
Then insert the cloth through the second sponge on the inside of the inner bucket. Snug the two sponges together against the bottom of the inner bucket.
Final Steps For Making Your Self-Watering Planter
Put the planting bucket into the reservoir bucket, then insert the PVC tube, angled end down.
To secure the tube, make a couple of holes near the top of the inner bucket and use a zip tie or wire to hold the tube in place.
When you put the two buckets together, make sure that the drain hole is lined up with the tube so when you’re filling it with water, you can easily see when the reservoir is full.


Secure the fill pipe to the inside bucket. The reservoir drain hole is directly below the fill pipe.
Next comes the potting soil. Make sure you use potting soil because this contains a lot of organic matter that allows your plants to breathe.
If you use heavy topsoil, the roots get cramped with little oxygen flow. I know that potting soil costs more, but a big bag will probably fill three 5-gallon containers.
Spread out the wicking cloth and tuck it into the bottom of the container. Fill the bucket 1/3 to 1/2 full of soil.

Spread the cotton wicks before starting to add the potting soil.
Cross the wicks over that soil layer, then add more soil. I like to fill the bucket about 3/4 full…

Fill with soil approximately half full. Then cross the wicks over the soil to create a greater wicking area for the water to climb into the potting soil.

Fill the bucket to 2″ of the top and prepare for your starter plants.
…then dig a little spot for your plant to sit. The basil I bought was in a jiffy pot, so the whole thing gets planted.

Place the starter plant into the soil, then add soil to cover the remaining wick up to the base of the starter plant.
Put your Plant into the Planter
Once your plant is placed at the correct depth, lay the wicks down so they get covered by another 2 inches or so of soil. This is where I trimmed off 6 or 8 inches of the towels since they were extra long.
Gently water the topsoil and then fill the reservoir through the standpipe until the drain hole squirts water.
Fill the pot with additional soil until it is the correct depth for your plant.
To start the wicking process and make the soil settle, water the soil around the plant pretty generously then fill the reservoir through the fill pipe.

The 5 gallon self-watering planter is working. Just wait for the plants to grow.
You can tell when the reservoir is full when the drain hole starts shooting water.
Check the container for the next couple of days for it takes some time for the wicking action to draw water up to the top of the soil.
Add a quart or so of water to the soil if it seems necessary in the first few days. After that, the soil should feel moist when you dig in a little and you’ll know that the wicks are working.
I fill my reservoirs every 4 or 5 days, but I could let them go longer than that since they seem to be still half full.
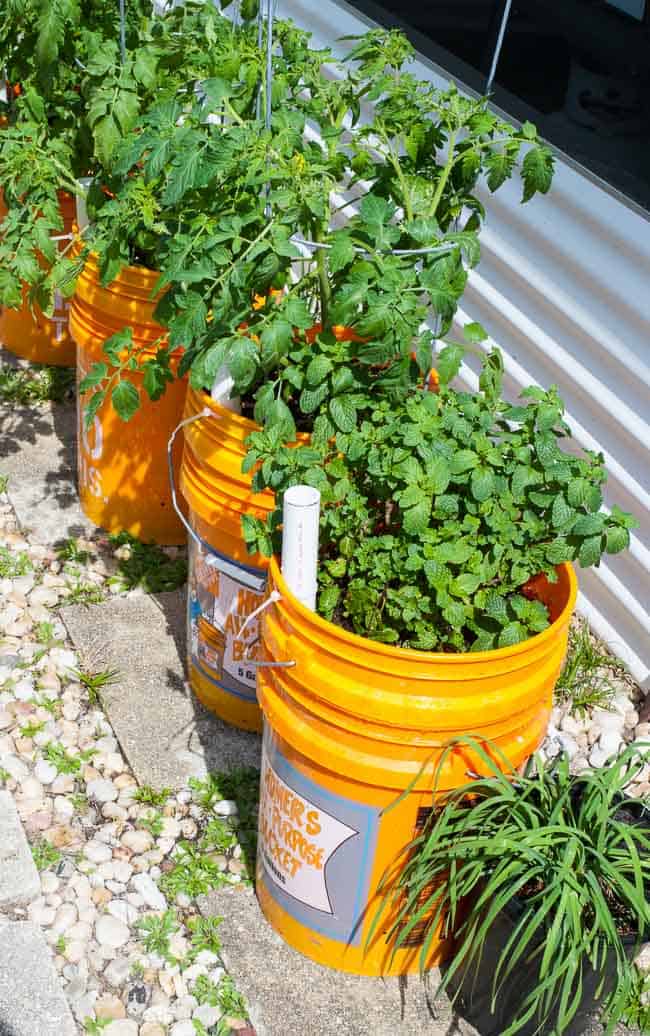
I started the tomato plants on February 2nd and they were small and 10″ tall.
They are on the west side of our house and get great sun in the afternoon. They would probably like all-day sun, but then I’d have to put them in our back yard and I’d never get to look at them.
The mint next to them is going wild too, spreading and filling the planter. Looks like we’ll have to have a mojito party soon.
I know you northerners are itching to get some plants started. Your day will come. Just plan on trying a couple of containers for tomatoes, peppers, or herbs. The self-watering planter makes caring for them so easy.
Bruce Fisher
Buy 1 5 gallon bucket and a $50 10 inch plastic plate at Walmart. Drop it in the bucket and it will wedge in about 4 inches from the bottom. Then drill the holes needed in the plate and bucket as you would have in the second bucket. I also drill a hole in the center of the lid for the plant stem and then cut the lid in half so it acts as mulch but can be removed for access to the plant and soil.
Joe Boyle
Hi Bruce,
Interesting way to make the planter. I assume you meant a .50 cent plastic plate. That would certainly work. Nice idea for the lid too. Thanks for the comment.
Jodi
This is great! I’ve got some buckets out back and can’t wait to try it, thank you!!
Joe
Thanks for the comment Jodi. Happy growing!
Tara
Hello! I am very new to gardening. How many herbs such as basil, rosemary, etc. would you suggest you could put in the 5 gallon bucket? Thank you❤️
Joe
Hi Tara,
I would recommend no more than 2 different herbs per planter. Some herb plants are spreaders though, so they should be in their own planter. Oregano, mint, and sage are examples of spreading herbs.
Your local library or county may have a Master Gardener program that you could get recommendations from.
I hope this helps a little and have fun growing your own.
Joe
meania
good to know thank you.
Suzanne
Very nice, Joe! Perfect for those of us who travel and want to come back to a thriving crop on the patio.
Amy B
Cool! Those don’t look too hard to do, maybe I should try it for some of my herbs this year!
Joe
Hi Amy, Start gathering 5 gallon buckets. I’ll bet the hospital gets food in them then throws them away. Having to buy buckets is the most expensive item to get. Your herbs would love a self watering planter.